
0. Introduction
Hello, I'm 재뷰리, a Server 1 player.
"World play guide" sounds pretty broad, so it's hard to know where to start,
so I'll just ramble through it section by section, following the guideline written above.
Personally, I prefer a server atmosphere where attacks and wars break out freely.
Server 3, where I first started, was like that, and Server 1, where I am now, is the same.
I've lost sleep worrying about getting raided at dawn,
spent hard on the game just to keep up with the endless competition,
and been through exhausting fights when tempers flared,
but that's the charm of a war game — looking back, they're all good memories.
Through all that endless competition and endless war, I studied and picked up all sorts of little tricks for fighting enemies,
and I'll write down a few tips here as they come to mind.
1. Territory Expansion
Fruit used to have no use once your Guardians reached the max level of 150,
so it was just a currency lying around,
but with the recent Hall of Legends patch, Fruit has become one of the essential resources.
I don't know the situation on every server,
but the gap between someone hiding under a Shield without expanding their land
and someone who keeps expanding and mining Fruit even while their tiles get broken and attacked
will only grow wider over time, in my opinion,
so I strongly recommend going to the highest-level zone your Combat Power allows and expanding your territory there.
On an endless-war server, proudly mining Fruit in the G7 zone is a privilege of the strong,
and most people either sit cozily in the G5 zone with their Shield on, or expand in the G6 zone.
Among the tiles inside the G6 Fortress, claiming these points first makes defense much easier.
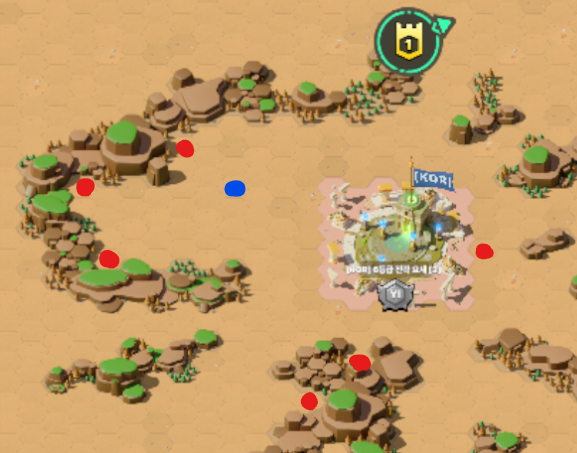
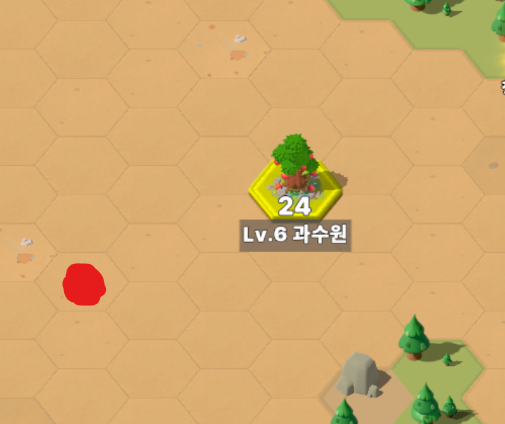
1) If you and your guildmates claim the spots marked with red dots and expand there,
when enemies attack, cover via Rally or Raid Camp support can arrive quickly,
and since reaching those points costs enemies a serious amount of Stamina and Soldiers, they can't push in carelessly.
Here's a simple example.
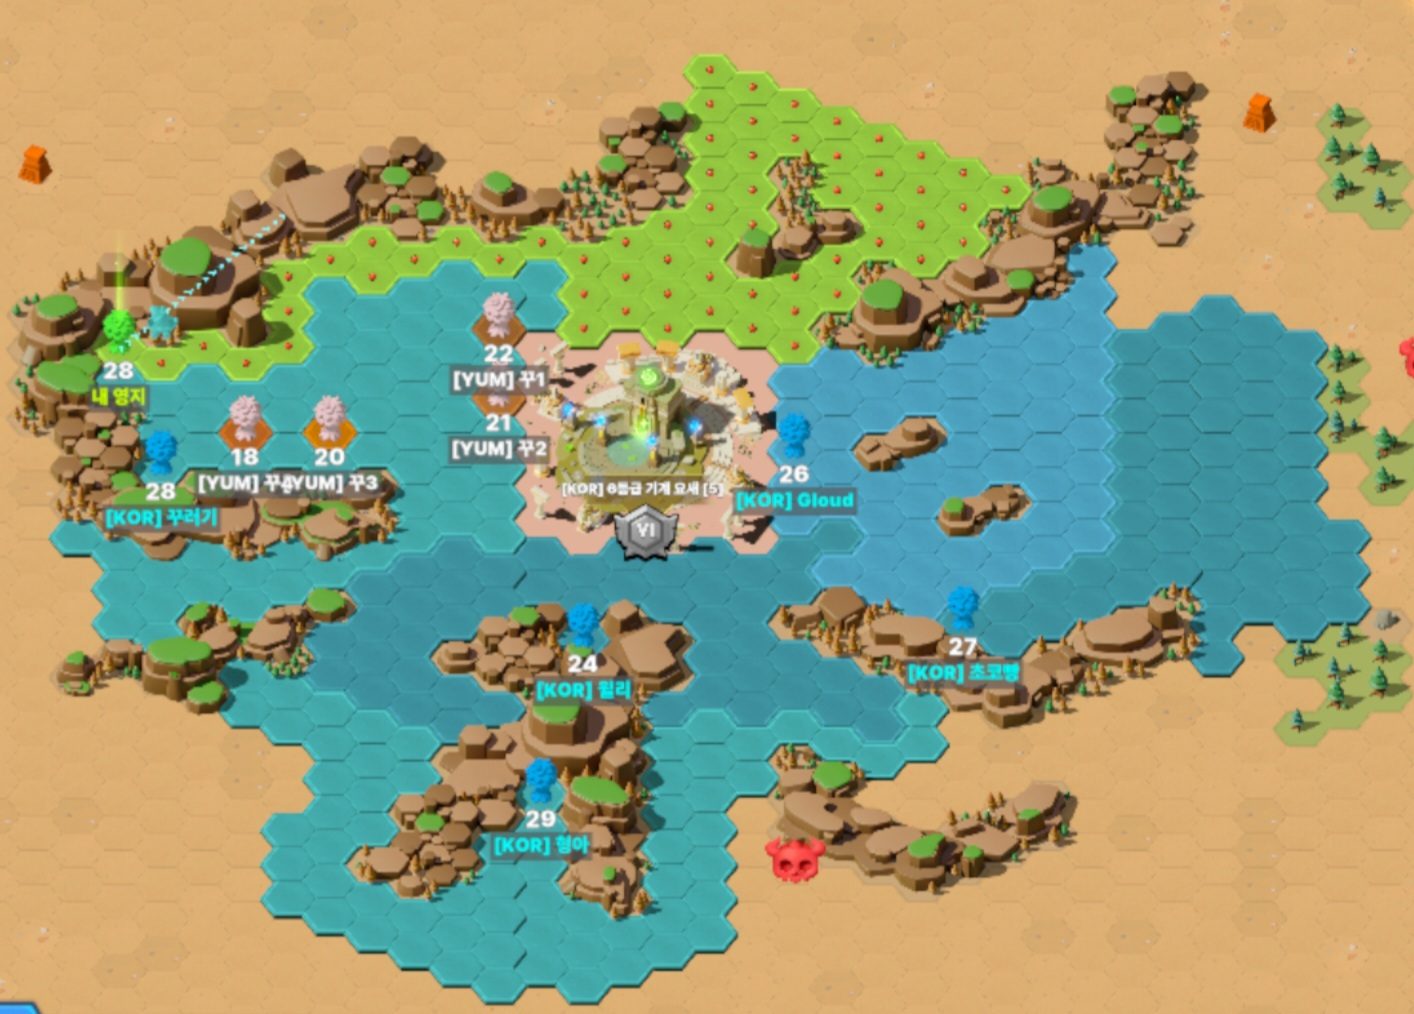
2) Normally when you use Auto Conquest, terrain can make your territory expand in really weird shapes,
which leads to the very annoying chore of trimming it up again,
but if you expand your territory from the blue-dot spot, it spreads out neatly inside the G6 Fortress.
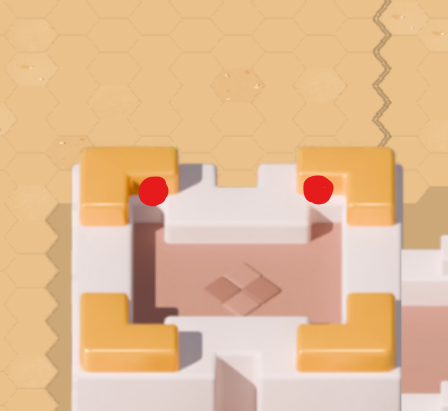
3) When you simply need to hide without expanding, move your main base onto the outer wall of the G6 zone
and it becomes quite hard to find.
One thing to keep in mind here: don't equip a castle skin — hiding in the default tree form stands out the least.
Also, if enemies keep coming to plunder your land, boldly hiding in the G2 or G3 zone
is actually better for staying out of the enemy's sight than the bot-filled G1 zone.
2. Move Village
Territory moving has a really fun quirk in how it's judged.
Once you send your Village off to its destination,
the move continues all the way through even if your main base gets broken mid-way — that's the mechanic.
You can use this for two kinds of attacks.
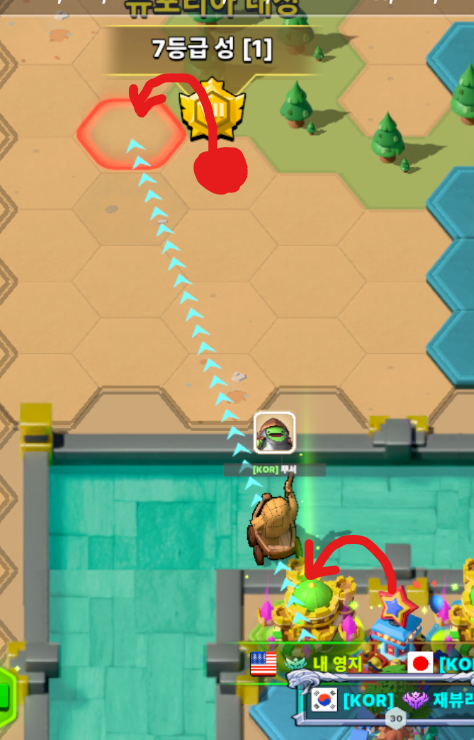
First, when an enemy starts a Village Move,
the movement line is visible as a line, and their main base is left defenseless.
Using this, find an enemy who carelessly started a Village Move,
attack while their base is in transit to break it and plunder it,
then wait at their destination in advance with a Teleport or a Raid Camp,
and break the enemy's newly created base once more when it arrives — a two-stage plunder.
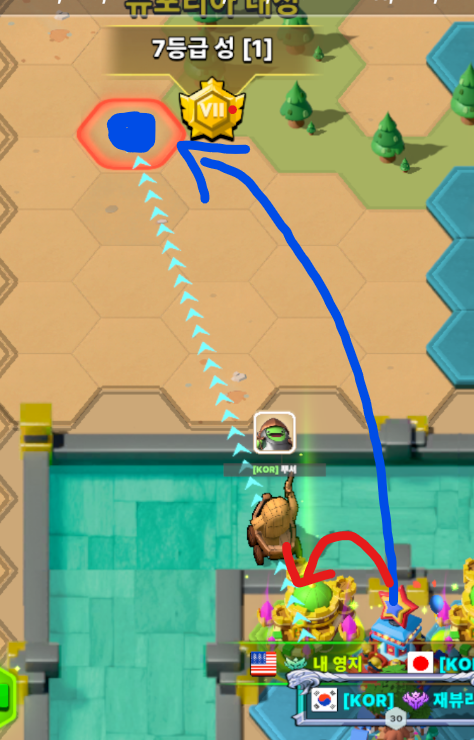
The other case is when an enemy moves their Village while under a Shield.
If you start a Village Move with your Shield on, the Shield stays up during the move.
But once you reach the destination, the Shield comes off.
Usually a resource-rich enemy complacently assumes they'll be safe
and moves their Village with the Shield on,
but if you send a Raid Camp to their destination in advance, or teleport there to block the landing spot,
their Village Move fails, and they end up at their original spot with only their Shield gone.
At that point, teleport next to them once more and eat them up.
3. Raid Camp
Attacks using a Raid Camp always call for caution.
It usually takes your first-string squad away and often has to travel a long distance,
so it's best to move it only when your main base's safety is secured.
When sending a Raid Camp at an enemy, think of it as taking the long way around:
split the trip into about two legs, stopping once at a waypoint,
and creep in quietly so the enemy doesn't notice.
Also, rather than placing it right next to the enemy's main base or territory,
it's better to drop it at a spot about 2~3 tiles away.
That way, even if the enemy notices late, the option of simply grabbing one tile around their base
to gain a way to defend against your Raid Camp is taken off the table.
Land captured by an Attacking Squad doesn't produce Fruit, so even if you break the tiles,
there's no cooldown, and empty tiles can be used immediately.
A Raid Camp's Relocate Village and Move share the same 5-minute cooldown,
so proceed carefully with Relocate Village.
4. Conquer Fortresses
Fortress conquest is content where guild unity and participation matter a great deal.
Every guild has its own strategies and tactics, but the simplest one is
having a strong player in the guild wrap the land around the Fortress,
while guildmates with relatively lower Combat Power move inside and work on it.
If you don't have a strong guildmate who can overwhelm the enemy, the next thing to lean on is participation:
set a Guild Assembly Point on the land around the Fortress,
then use Guild Village Teleports or Premium Village Teleports from various directions the enemy will struggle to cover,
closing in and attacking from up close.
You don't necessarily have to beat the enemy guild members,
since our only goal is to whittle down the Fortress's HP,
so if guildmates accept some losses and keep trying, the success rate is fairly high.
Honestly, if there's an invincible method of fortress conquest,
it's attacking while the entire enemy guild is asleep.
5. Fighting Enemies
By the nature of war games, higher Combat Power means you're stronger, plain and simple,
and in the end the weaker side is bound to lose,
but you can still harass the enemy with various little tricks, buy time,
and stack up damage on them.
The most basic approach is defending with your guildmates' help through a Rally,
but let me explain a few other tricks.
1) Pulling Soldiers Out
When an enemy comes to break your tiles and plunder,
put only your single weakest Guardian in your main squad and pull out all the Soldiers,
minimizing your Soldier losses
while making the enemy waste their Stamina.
The fewer Soldiers your squad marches out with at once,
the fewer Soldiers you lose in proportion — that's the mechanic this uses,
and you can flip it around: pull out all your Soldiers and go attack the enemy yourself,
losing 1 of your Soldiers while killing 10 of theirs each time —
it also works as a rather bizarre chip-away strategy.
2) Break Your Tile and Retake It
This is the best resistance the relatively weaker side can put up against a stronger enemy.
Master this technique and, at least in a 1v1, your main base need never be broken.
Here's how it works.
It's a strategy that uses the difference between the enemy's attack range and yours.
When an enemy stronger than you digs into your land,
if their attack range is longer than the distance from your main base to the tile under attack,
you break the tile being attacked first yourself,
then use your shorter attack range to retake that tile just as the enemy arrives.
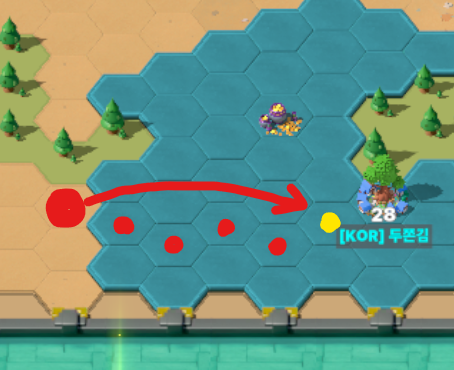
For example, when the red enemy is eating their way in from their base like that and about to attack the yellow spot,
두쫀김 breaks the yellow tile themselves with Abandon Territory the moment red declares the attack,
then retakes the yellow tile right as the red enemy's attacking squad arrives, wasting the enemy's attack chance.
The sense of distance and the timing math may feel a bit tricky at first,
but fight often and get it down, and it will definitely serve you well.
6. Closing
I thought I knew a lot more tips, but now that I'm writing them out instead of being in the actual moment,
they're just not coming to mind.
Still, I've jotted down this and that as best I could,
and I hope it helps, even a little.
Thank you for reading.